
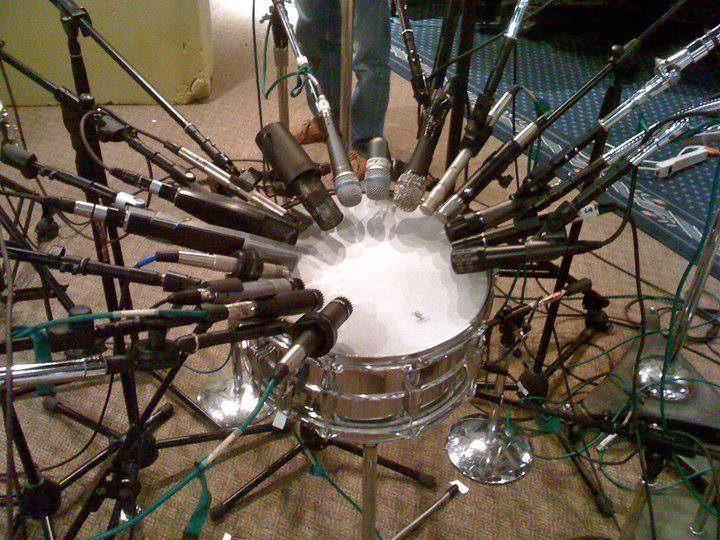
“Ur Doin’ It Wrong”; Image by Geoff Kaiser
There is a fascination, in the last few years, with primarily three features of orchestral sample libraries: If the number of multisamples/RR is in two digits, if it has sampled/”live legato, and how many mixable mic positions are available. Today, I’m going to talk a bit about the latter, “multiple mixable mic positions”, as well as using microphones effectively to create an effective experience for the end user of the samples, to the point where they really do have control over the tone of the instrument.
Now, when we record something, we know that our goal is typically to create an accurate representation of an instrument in whatever space we have available. In a single-mic system, we know that three things weigh heavily on the results of our recording: the type/specs of the microphone used, its pickup pattern, and the distance between the sound source and the microphone. With all instruments (and all spaces), the distance can have a profound effect on the tone and presence of an instrument. Therefore, it is logical that, after creating a comfortable stereo image, our next priority with microphone placement would be to find a way to bring the best qualities of each distance to the table.
Let’s listen to an example. Here’s the microphone setup used, and a few different perspectives/microphones and how they blend:

Up close (on the left), we have:
- Ribbon mic behind the bell to capture the warmth of tone that the player experiences when performing.
- LDC and SDC in parallel array (i.e. two mono inputs at equal phase in order to allow the characteristics of two mics to be effectively combined- highs from the SDC, body from the LDC.
Further back (on the right), we have:
- Spaced stereo pair (LDC’s) to give the stereo positioning and the space of the stage.
- Far “ambient” mics to give a sound not to dissimilar with what an audience would experience. Far mics are more or less useless to me (as it’s typically more or less “excessive baked reverb”), but some people really enjoy them.
Here’s what the whole thing sounds like as one.
Effectively, this mic setup (7 mics total, 8 if you subbed a decca tree for the spaced pair) allows for me to fine-tune the sound I want from the trumpet… if I want a more orchestral tone, I can switch the far and “main”/spaced pair mics to be louder than the close and vice versa for a more pop/jazz tone. I could export three total mic positions- all the close (as one mono position), the main mics, and the ambient mics, and essentially give this flexibility to the end user.
When Not in Rome
Of course, this example works great because it was recorded in a great space. This leads to one of the great issues of sampling, which is using your space right. If you are recording in a small studio or room, your primary focus with mic placement should instead be to have as little room tone as possible in the recording. This is what I did with these viola section samples, recorded in a drywalled classroom; a very minimal mic setup- a fairly close spaced stereo pair and a single close spot/overhead mic, and likewise with the cellos (you can hear both with pizzicati together). Of course, if we get too close with our main mics, there is too much proximity and the sound tends to become… well, less than pleasant for many instruments (horns, for example, are dreadfully bad close-mic’d), although still quite lovely for many others (pianos, harps, etc.).
Always be sure you hire professionals!
In this case, we can’t really get away with a multi-mic setup! Our close mic doesn’t really ADD anything to the tone of the instruments other than a bit more volume (I mean that in the geometric sense rather than the musical sense). Of course, if you really wanted to, you could use effects and reverb to generate a far perspective… but that would be redundant to simply adding or recommending the usage of a reverb effect and not very resource-efficient.
Multimic & (Orch.) Snares, a Match Made in Heaven
A great example of where to use mixable mic positions would have to be, in my opinion, snare drums. Snares are mic heaven, as the chosen picture of the post just comes to show. The colors you can pull and shift through via mixing mic positions are nearly endless.
Here’s an example of a snare drum:
- Overhead SDC + close LDC to capture the actual hitting of the drum.
- Close SDC underneath to capture the rattle of the snares.
- Spaced pair main mics (LDC’s).
- Ambient mics.
And the whole thing together…
Essentially with the snare, we can create an effective close-mic sound by blending the close mics (like so), but also an effective ensemble sound with the spaced pair/ambient mics. This way, the end user has complete control over the setting and placement of the snare and every mic has a distinct purpose in the completion of the tone.

All you need are some artsy close-ups, screw mic positions.
Phasing: The Nemesis of Multimic
The trouble we face as we deal with all these mic positions is, of course, phasing. As soon as you move from one mic to two, the ballgame drastically changes. The way coincident pairing and parallel arrays work, is that we use the constructive interference in each mic to augment the overall resultant tone, such as in the case of the snare’s close mics above, or the trumpet example before. Essentially, the crests and troughs of the waveforms (the physical compression and expansion of the air molecules) reach the microphones at the same time (or the resultant audio is phase-reversed or otherwise edited to align properly in post). However, if you’re not careful with your recording and/or your mixdown, you will end up getting destructive interference, which results when elements of two signals, when combined, cancel each other out in part or whole. This can result in some dreadfully bad tones, far worse sounding than each mic position in its own.
The easiest way to combat this is first, to record a few test passes if you have time to do so at the session. Just a 20-second clip of the player performing whatever they want. Use this to both calibrate mics, and also check for phasing, by soloing one mic (I start with the mono/close mics) and adding one mic, then testing to see if the phase reverse option improves or damages the sound. Once you are happy, un-solo/re-mute the second mic, then add the next mic. It’s best to put things a little section on repeat.
If you don’t have time at the session, it’s okay to just go ahead and record, so long as you are recording multi-track with all the mics recorded independently. Then, you can go back later, prior to the mixdown for cutting, and do the process described above.
If the switching of phases does not greatly improve/wreck the tone, you may want to use a channel delay tool or otherwise zoom in really close so you can see the waveforms, and manually try to align the waveforms.
It should lastly be noted that that distance of microphones from the source also equates to delay before the signal meets the mic. This can actually be a good thing, with ambient mics, and I essentially just leave it there as “pre-delay” on the wet signal. If it bothers you, you can phase-lock up the ambient mics with the close mics, although you will lose a lot of the room tone the ambient mics brought to the mix. The phasing this distance introduces can also benefit the tone, oddly enough, giving it more distance or a better sense of blend, even if partially destructive.
Until next time!

Disclaimer: the content of this essay is for entertainment purposes only. I am not and do not claim to be in any way an expert on any of the subjects discussed, only a keen student with some broad interests and a willingness to share my interest.

